Deploy Workload Locally
In this guide, we're going to use the simplest possible mechanism to deploy an app. It uses a very basic workload config.
Prerequisites
You'll need a local Threeport control plane for this guide. Follow the Install Threeport Locally guide to set that up.
Configs
First, create a work space on your local file system:
1 2 | |
Download a sample workload config as follows:
1 | |
You now have the workload config on your local file system. If you open the file you'll see it has the following fields:
1 2 3 | |
The Name field is an arbitrary user-defined name that must be unique, i.e. no
other workload may use the same name.
The YAMLDocument field refers to another file with the Kubernetes resource
manifests. Download that file as well:
1 | |
Create Workload
We can now create the workload as follows:
1 | |
This command calls the Threeport API to create the Workload objects. The API notifies the workload controller via the message broker. The workload controller processes the workload definition and creates the workload instance by calling the Kubernetes API.
We can use qleetctl to view deployed workloads:
1 | |
Note: the status of the workload will state Reconciling or Down for a short
time until the workload is running. It will usually take a minute or two for
the container images to be pulled to start the containers. Once the Threeport
agent confirms the workload is up, you will see the status become Healthy.
We can also use kubectl to query the Kubernetes API directly. First, set a local
environment variable to the appropriate namespace for the WordPress application:
1 | |
Confirm the WordPress application is running with:
1 | |
If using the kind provider, you can now visit the WordPress application by forwarding a local port to it with this command:
1 | |
Now visit the app here. It will display the welcome screen of the WordPress application.
Namespace Management
You may have noticed the Kubernetes manifest does not include a namespace resource for the sample WordPress app. This is the recommended way to deploy workloads with Threeport. If you don't supply a namespace, Threeport will manage namespaces for you, allowing you to seamlessly deploy multiple instances of a workload to a particular Kubernetes cluster.
Summary
This diagram illustrates the relationships between components introduced in this guide.
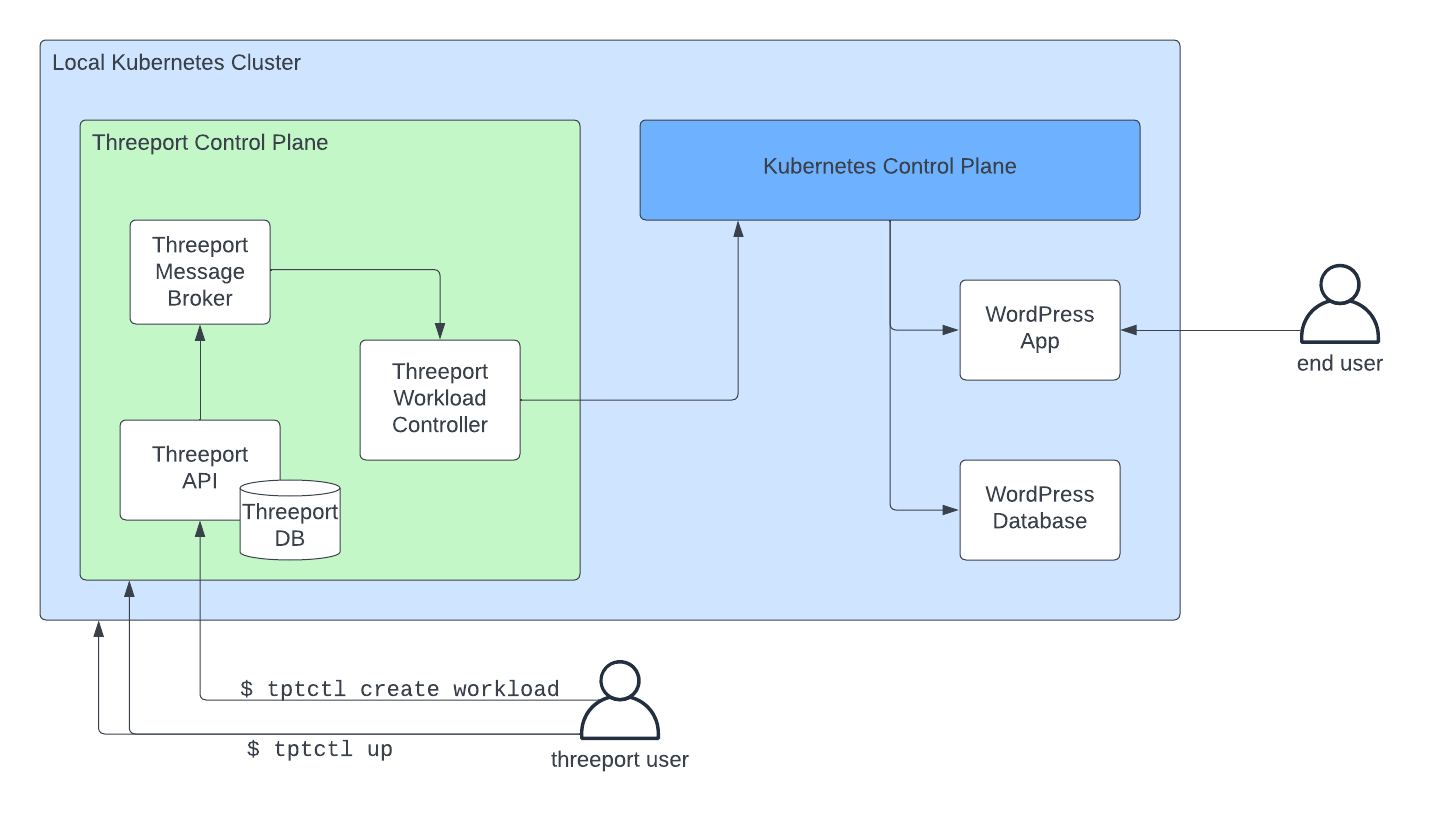
When we installed Threeport using qleetctl up we created a new
control plane on a new Kubernetes cluster.
When we installed the sample app using qleetctl create workload we called the Threeport
API to create the workload. The reconciliation for these objects was carried
out by the workload controller which created the necessary Kubernetes resources
via the Kubernetes control plane.
While this approach doesn't provide any special outcomes that you could not have achieved with other tools, it does do something unique under the hood. It manages Kubernetes workloads using a workload abstraction and the corresponding controller that enables the following:
- Support Service Dependency Management: Installing and configuring support services such as ingress, TLS termination, DNS management and more.
- Cloud Provider Service Dependency Management: Calling cloud providers on your behalf to spin up managed services such as S3 and RDS that your app relies on.
To see these features in action, see our guides on installing Threeport in AWS and deploying workloads there.
Clean Up
To delete a workload:
1 | |
To uninstall the Threeport control plane locally:
1 | |
Remove the test configs from you file system:
1 2 | |
Next Steps
Next, we recommend you try out Threeport on AWS. See our Install Threeport on AWS guide for instructions.